How to Roast Vegetables – 7 Tips for Great Results

Roasting vegetables releases their natural sugars, concentrating and intensifying flavors. Their exteriors get nice and caramelized, while the insides remain moist. The result is quite delicious and a great way to enjoy eating more vegetables.  Roasting is so simple to do.  Here are a few tips to help you get great results.

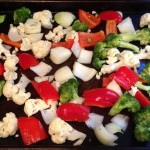
  1. Initial prep – Wash vegetables, blot dry (if too wet, moisture will cause them to steam rather than roast), and CUT INTO SIMILAR SIZE PIECES, so that they will cook evenly.
  2. Coat LIGHTLY with oil.  You still can get a good result with no oil, but oil helps the vegetables brown more evenly, and I think creates a little more intense flavor.  However a little oil goes a long way, so just DRIZZLE, and toss to coat evenly. Not only is a lot of oil not good for you, it will make the vegetables greasy.  I generally use a neutral oil, such as organic Canola, that has a high enough smoke point for the high heat of roasting.  I use about 1.5 tablespoons of oil for a large tray, about 1.5 pounds, of vegetables.
  3. Season with salt and pepper.  I always use freshly ground black pepper, and prefer coarse sea salt (about a 1/2 teaspoon of salt for the tray of vegetables). Using just salt and pepper is enough to bring out amazing flavor, but you can try endless variations by optionally adding any spices and dry or hearty fresh herbs of choice. (Delicate fresh herbs like parsley and basil are best added after roasting because the high heat would destroy them.) Roasted vegetables before oven
  4. Use an appropriate pan.  The pan should have low sides to allow the heat to hit the vegetables directly.  A simple sheet pan is ideal.  Also, the pan needs to be large enough to spread out the vegetables in a single layer.   rouxbe brussels roasting
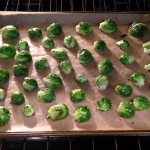
  5. Optimally lay out the vegetables.  Most important, DO NOT CROWD. You want them to roast in direct heat, not steam.  Lay vegetables in a single layer.  Use additional pans if necessary.  If your vegetables are cut such that they have a flat side, lay them flat side down.  It just helps get a nice, even browning. And if you have some larger pieces, place them at the perimeters of the pan, which tend to get the hottest.
  6.  Use high enough heat and move the vegetables.  Most vegetables roast well at 400-450 degrees Fahrenheit.  Preheat your oven to the desired heat and try to maintain the heat by keeping the oven door closed as much as possible.   For even cooking, about halfway through the roasting time,  you’ll want to TOSS the vegetables.  It’s also a good idea to rotate the pan, since the back of the oven is a little hotter.  Ovens loose heat quickly when you open the door, so keep door opening to a minimum, and close the door while you’re tossing the vegetables.  Generally speaking, it‘s best to place your pan in the center of the oven for even cooking.  However if you have multiple pans and need to use multiple racks, just alternate the pans at the halfway point.roasted vegetables out of oven
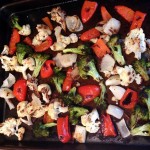
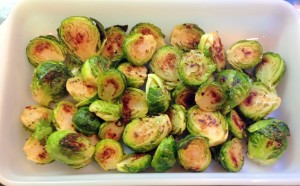
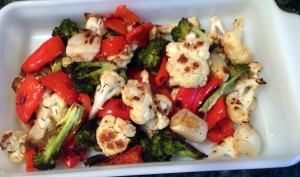
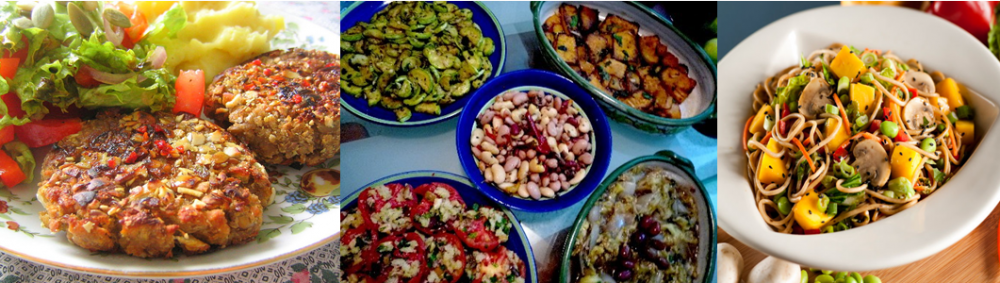
  7.  Length of time – There’s a lot of variation depending on the vegetable and personal preference.  Personally, I roast most vegetables for between 10-30 minutes.  Harder, denser vegetables such as root vegetables, I’ll roast longer, typically 30 – 50 minutes.  I roasted the Brussels sprouts in the photo for only 12 minutes at 400 degrees Fahrenheit. (Some people prefer to roast theirs much longer.)  I roasted the mixed vegetables pictured for about 25 minutes at 425 degrees Fahrenheit. cropped roube brussels finishedroasted vegetables plated

Baked Eggplant Parmesan

eggplant dishHere’s a recipe for a really delicious and healthful version of eggplant parm.  Like any eggplant parm recipe, it is a little time-consuming, but it’s not difficult.

The traditional way to prepare eggplant parm is to coat eggplant slices in egg, fry in oil – and eggplant absorbs lots of oil – and then load the casserole with dairy cheese. Of course not only is the dish not vegan, it’s loaded with fat and calories, and frying the eggplant slices before baking the casserole is labor-intensive.  In this recipe we replace the egg and dairy with plant foods, and pre-bake rather than fry the eggplant slices.

You’ll want to allow about 2 hours to do everything start to finish.  However a lot of that time is inactive. The actual work time is about 30-40 minutes, and a little less if you don’t make homemade sauce.

INGREDIENTS

HOMEMADE SAUCE (Could use store bought if you prefer)

  • 2-3 tablespoons or as needed, olive oil
  • 1 medium onion, chopped
  • 3-6 cloves garlic, chopped (I like a lot)
  • To taste, crushed red pepper (optional)
  • ½ cup dry red wine (optional)
  • 2  28-oz cans organic tomatoes of choice – crushed, pureed, diced, or whole that you mash
  • Tablespoon or as needed, tomato paste
  • Italian seasonings to taste – approximately 1-2 tsp dry (mix of oregano, basil, thyme, parsley).  Fresh basil leaves are very nice to add as well. Use 4-6.
  • 1-2 Bay leaves

TOFU RICOTTA

  • 1 package firm or extra-firm tofu, drained and pressed
  • 2 teaspoons fresh lemon juice
  • 1 teaspoon or more of garlic powder
  • 2 teaspoons dry basil (or 2 tablespoons of fresh)
  • 1/3 cup nutritional yeast flakes
  • ½ teaspoon or more of sea salt
  • As needed, freshly ground black pepper
  • 2 teaspoons olive oil

FOR THE EGGPLANT

  • 1 large or 2 small eggplant peeled and sliced thin (about ¼ inch). You can slice length-wise or in rounds.
  • 1 cup almond or soy milk
  • 1 tsp apple cider vinegar (white vinegar or lemon juice work too)
  • 3/4 cup flour of your choice
  • 2 cups Panko breadcrumbs
  • Italian seasoning mix (or oregano, basil, thyme), garlic powder, onion powder, sea salt, and fresh black pepper
  • As needed, olive oil

OTHER INGREDIENTS FOR CASSEROLE – ALL OPTIONAL

  • 10 oz fresh organic baby spinach, rinsed
  • Assorted chopped vegetables of choice, such as red pepper, mushrooms, broccoli, lightly sauteed
  • ½ cup or as needed, vegan mozzarella shreds
  • As needed, additional nutritional yeast

DIRECTIONS

The preliminary steps are to:

  • Gather and prep all ingredients per ingredients list.
  • Sweat the eggplant. Place the eggplant slices in a colander and salt them liberally on both sides.  Just leave them to sit for about 30 minutes. Then rinse with water and pat dry. Sweating the eggplant removes moisture, tenderizing the eggplant and removing bitterness. Sweated eggplant also absorbs less oil.  I confess I sometimes skip this step depending on my personal evaluation of the eggplant (and amount of time I have), but it does make a small difference.
  • Drain and press the tofu – Simply place the block of tofu on a plate, cover with a paper towel or clean dish towel, place another plate and something with weight, such as a large can of tomato sauce, on top and let sit for 10-15 minutes. Discard excess water and pat tofu dry.

MAKE THE TOMATO SAUCE — You could skip this step and use store-bought sauce. Just check the ingredients to make sure there’s not too much sugar. Making your own is very easy, economical, and you control what goes into the sauce.

  1. In a large pot, heat about 2 tablespoons of olive oil; add onions and sauté’ until transparent, about 5 minutes, stirring frequently. Add garlic – and if you like a little heat, also add in a little crushed red pepper — and sauté another minute or two.
  2. Add wine, if using, and let cook a few minutes.
  3. Add tomatoes and paste and stir.
  4. Bring sauce to boil; reduce heat to simmer for about 40 minutes, stirring occasionally.
  5. Adjust seasonings to taste.
  6. Remove bay leaf and discard.

MAKE THE TOFU RICOTTA

  1. Mix all ingredients in a food processor.  You may also mix by hand.  If mixing by hand, add olive oil last, after you have reached the appropriate “ricotta” consistency with the other ingredients.

PREPARE AND PRE-BAKE THE EGGPLANT

  1. Preheat oven to 375 degrees, and lightly oil a baking sheet.
  2. Make the batter.  In a large shallow bowl, mix the plant-based milk and apple cider vinegar.  Let sit a few minutes and then mix in the flour.
  3. In another large shallow bowl, put the breadcrumbs and liberally mix in seasonings. (You also could just use pre-seasoned breadcrumbs.)
  4. Wet both sides of the eggplant slices in the batter, dredge them in the bread crumbs, and place on the baking sheet.
  5. Spay or drizzle a little olive oil on the eggplant slices
  6. Bake approximately 12 minutes per side until slightly crisp and golden

sliced eggplantbatterbreadcrumbsbreaded eggplantbaked breaded eggplant slices

ASSEMBLE THE CASSEROLE

  1. Cover bottom of pan with just a very thin layer of tomato sauce.
  2. Lay eggplant in single layer at bottom of pan. If you have more eggplant than fits in single layer, you’ll add it to the top.
  3. Add the tofu-ricotta and spread fairly evenly. Reserve some to spread on the top.
  4. If using, add the optional spinach and sautéed vegetables. Add additional eggplant slices if you have them.
  5. Cover everything liberally with Tomato Sauce.
  6. If using, sprinkle on optional vegan mozzarella shreds and/or nutritional yeast.
  7. Top with remain tofu ricotta.
  8. Bake uncovered at 350 degrees for about 35 minutes.

Let sit for 10 minutes before serving.

eggplant casserole

Recipe makes about 8 servings

Mushroom Gravy

This mushroom gravy is easy to make and really delicious. It’ll make a nice addition to your Thanksgiving table. You can use it on anything for which you’d use traditional gravy. It’s great with mashed potatoes as well as any number of “main” dishes including Tofurkey or other Turkey-style roasts, Lentil-Nut Loafs and Pot Pies.

Ingredients:

  • 1  onion, finely chopped
  • 12-16 oz  cremini mushrooms, finely chopped
  • 4 cloves  garlic, minced
  • 1/3 cup  flour
  • 2 teaspoons  dried thyme
  • 1 teaspoon  dried sage
  • 1/2 cup  dry white wine
  • 3.5 cups  vegetable broth
  • 2-3 tbls  vegan butter
  • 1 tbls  tamari sauce
  • 2 tbls  nutritional yeast (optional)
  • To taste  salt & pepper

Directions:

1. In a skillet over medium heat, heat vegan butter, add onion, mushrooms, salt and pepper, and sauté until translucent

2. Add sage and thyme & stir

3. Add flour and whisk, creating a roux

4. Add white wine and turn up the heat. Let wine reduce for about 3 minutes.

5. Add tamari sauce and vegetable broth (& optional nutritional yeast). Lower heat back to medium and cook about 15 minutes stirring often.

6. Taste for salt and pepper and serve.

(Serves 8)


Quinoa with Black Beans and Mango Salad

QuinoaBBmangosalad

This salad is a nutrition powerhouse as well as being tasty and satisfying.  It’s high in complete protein, complex carbohydrates, fiber, vitamins, minerals, and phytochemicals.


Ingredients:

  • 1 ripe mango, peeled and diced small
  • 1 red pepper, seeded and diced small
  • 1 small red onion, thinly sliced and chopped
  • 1/2 cup chopped fresh cilantro (if you don’t like cilantro, instead add 1/2 teaspoon of coriander to the dressing)
  • 2 cups cooked quinoa, cooled
  • 1 15-ounce can of black beans, drained and rinsed

For the dressing:

  • 3 tablespoons red wine vinegar
  • 3 tablespoons extra virgin olive oil
  • 2 tablespoons fresh lime juice (fresh lemon juice also works)
  • ½ teaspoon cumin (or more to taste)
  • ½ teaspoon garlic powder (or more to taste)
  • To taste – coarse sea salt, freshly grated black pepper, cayenne pepper
  • As needed – lettuce leaves for plating (optional)

Directions:

1. Unless you have some left over cooked quinoa, you of course must first cook and cool the quinoa. Cooking about 3/4 a cup of dry quinoa will yield you the 2 cups cooked. Rinse the quinoa well in a fine mesh strainer before cooking to remove the bitter saponins (the plant’s natural insecticide). Cook quinoa for about 15 minutes in boiling water (2 parts water to 1 part quinoa). If necessary, strain off any extra water that didn’t absorb and then let the quinoa sit after cooking so it’s fluffy and dry. (You don’t want soggy quinoa.)

2. In a large bowl, combine quinoa, black beans, mango, red pepper, red onion, and cilantro.

3. In a small bowl, whisk together all of the dressing ingredients.

4. Drizzle dressing all over salad and toss to combine everything. Ideally let it sit for a while for the flavors to meld. Serve at room temperature or chilled.

Serves 4-6


Ridiculously Easy Recipe for Brownie-Muffins

I saw this recipe on an episode of the “Hungry Girl” cooking show. It was just so easy that I had to try it. The results were quite tasty.

Ingredients:

  • 1 (18 1/4-ounce) box of devil’s food cake mix
  • 1 (15-ounce) can of pumpkin

Directions:

  1. Pour cake mix into a large bowl and remove any lumps.
  2. Add pumpkin and stir until completely combined.   That’s it for the batter!
  3. Fill a 12-cup muffin pan – either lined with foil baking cups or lightly oiled – and bake in oven at 400 °F for about 20 minutes. (To test for doneness, insert a toothpick into the center of a muffin; it should come out clean.)

Enjoy!

Eggless Salad

Here’s a quick and easy tofu-based dish that’s reminiscent of egg salad. Like egg salad, it’s filling, high in protein, works well in a sandwich or on top of salad greens. This dish however is great if you avoid eggs – whether you’re avoiding/limiting saturated fat and cholesterol, concerned about contamination, or simply boycotting an industry that inflicts numerous harms on birds while using the females as production units and “economically” (brutally) killing the newborn male peeps. 

Deep breath.

You could make this dish without some or all of the vegetables and it would still be good.  But if you’ve got the vegetables in your kitchen and a few extra minutes, I suggest you use them as they do add extra flavor and nutrition as well as a nice crunch.

Ingredients

  • 1 lb block of extra firm tofu, drained and excess water squeezed out
  • 1/3 cup Vegenaise or other eggless mayo
  • 4-5 stalks scallions (green onions), finely chopped (optional)
  • 1 stalk  celery, finely chopped (optional)
  • 1 carrot, finely chopped (optional)
  • 1 red bell pepper, finely chopped (optional)
  •  1.5 tbsp pickle relish (optional)
  • 1 tbsp Dijon mustard
  • ¼ tsp turmeric
  • 1.5 tsp garlic powder
  • ¾ tsp onion granules or powder
  • 1 tsp sea salt
  • To taste freshly ground black pepper

Directions:

1. In a large bowl, mash tofu with your hands or a fork.

2. Add all other ingredients and combine well.  Adjust seasoning if necessary.

Makes about 4 servings

Easy Pumpkin Pie

 Ingredients:

  • 1 can (15 ounces) pumpkin
  • 1/2 cup maple syrup
  • 1/2 teaspoon salt
  • 1 teaspoon ground cinnamon
  • 1/2 teaspoon ground ginger
  • 1/4 teaspoon ground cloves
  • 1/2 teaspoon ground nutmeg
  • 1 teaspoon ground allspice (optional)
  • 2-3 tablespoons cornstarch to firm up the pie filling
  • 1 package (12 ounces) silken tofu (not low-fat)
  • 1 9-inch unbaked vegan pie shell (available in frozen section of super markets Just read labels)

Directions:

  1. Preheat oven to 425 F.  Blend the pumpkin and maple syrup. Add salt, spices, cornstarch and tofu, and blend thoroughly. 
  2. Pour mixture into pie shell and bake for 15 minutes.
  3. Lower heat to 350 F and bake for another 60 minutes. 
  4. Let sit and then Chill
  5. Serve 

Homemade Almond Milk

It’s so easy to make your own almond milk – as long as you have a reasonably high speed blender. You’ll also need to plan ahead, as it’s best to soak the almonds.

Ingredients

  • 1.5 cups raw almonds*
  • Water for soaking almonds
  • 4 cups filtered water*
  • 2 to 5 pitted dates — and/or another sweetener of your choice, such as maple syrup, agave nectar, brown rice syrup or stevia.
  • ½ teaspoon vanilla extract
  • A pinch of sea salt
  • Optional flavorings. A few options to try: ¼ tsp cinnamon,1/4 tsp nutmeg, a ripe banana, ¼ cup cocoa, or additional vanilla extract.

*Adjust the quantity to whatever you prefer, keeping a ratio of 1 part almonds to approximately 2.5 to 3 parts water.

Directions

  1. Soak the almonds for at least 4 hours, preferably over night.  Soaking softens the almonds for smooth blending and makes them more digestible.
  2. Drain the almonds and discard the soaking water.  Put the almonds in the blender, along with the filtered/pure water, dates/sweeteners, vanilla extract, salt, and any optional flavorings.
  3. Blend at high speed until very well mixed.
  4. Strain into a bowl or wide mouth jar.  I buy inexpensive paint strainer bags, which work as well as nut milk bags. You also could use a cheese cloth or fine mesh strainer.  Using a regular mesh strainer will take you a little longer to strain.  The nut milk /paint strainer bags or cheese cloth allows you to squeeze the liquid out, making the process quick and easy.  (You can save the leftover pulp to use later for baking.)
  5. Serve and/or pour the almond milk into a container for storage.  You can store in your refrigerator for up to a week. Shake before serving again.

Your Mashed Potatoes

OK, making mashed potatoes is pretty simple and forgiving, and you’re likely to get an edible end product even if you’re haphazard. Basically you boil some potatoes, mash ‘em up with some fat and liquid, and add seasoning/flavoring – done. 

However if you want to consistently get good results, here’s some information to help you make conscious choices.  With mashed potatoes, many of the choices involved come down to personal preference. 

1. “Boil some potatoes.” 

What type of potatoes?  You can use pretty much any type of potato. Many people prefer high starch potatoes, like russets. They’re easy to mash smooth with no lumps, and perhaps make the fluffiest mashed potatoes. They do tend to be a little blander than if you use all-purpose or waxy potatoes. Yukon Gold and Redskin potatoes are two of my personal favorites for mashing.  Yukons have a natural buttery flavor and both of these potatoes produce a creamy flavorful result.

Do I peel them?  You’ll probably want to peel thick-skinned potatoes like russets.  Thin-skinned potatoes work well either way. Leaving the skins on is less work, provides some extra nutrition, and creates a rustic look. Just be sure to scrub the potatoes well. Really the decision to peel or not comes down to personal preference.  (By the way, you can peel before or after you boil.)

How / do I cut them before I boil them?  If you cut them before boiling, do not cut any smaller than about square inch pieces. Simply halving or quartering the potatoes typically works well.  It’s important to make the pieces fairly uniform in size for even cooking. The advantage to cutting before you boil is that it will take less time for the potatoes to cook. The advantage of boiling potatoes whole is there’s less chance they’ll absorb too much water, which would make them heavier and less fluffy.  

What about the pot and water for boiling?  You want to put the potatoes into an adequately large, deep pot, cover them with cold water, and add salt.  Then bring the water to a boil.  Unlike cooking most foods, where you want to add the foods to an already heated pot/pan/oven, with boiling potatoes you want them to heat gradually along with the water.  They will cook more uniformly this way and produce a slightly better texture.

How long do I boil them for?  Basically you want the potatoes to be tender – to the point where you can put a fork in without resistance.  Typical cooking time is 15 to 30 minutes, depending on size and type of potato. You want to keep the water at a low boil the whole cooking time. When the potatoes are tender, drain them and let sit for a few minutes to dry and cool a little bit.

2. “mash ‘em up with some fat and liquid.”

What do I mash them with?  With your drained potatoes back in the pot, mash them up with a potato masher and/or fork. If you don’t want any lumps, using a ricer would be a big help.  If you don’t have one, you’ll have to work a little harder.  Do NOT use a food processor or electric mixer or you’ll end up with gummy potatoes. Add the fat and liquid as you mash, adjusting the quantity as needed to achieve your desired texture.

What fat do I add?  You can use a vegan margarine or just olive oil. The quantity obviously depends on the amount of potatoes and your personal taste. (For 2 pounds of potatoes, you might use 3-4 tablespoons of fat.)

What liquid do I add?  Any plant-based milk will work fine.  I like to use almond or soy.  Other options are plant-based creams, vegetable stock, or even water reserved from the boiling.  It’s a good idea to warm the liquid before adding, or at least not have it cold. For 2 pounds of potatoes, you’ll probably need about a cup of liquid, but add a little at a time and adjust the quantity as needed.

3. “add seasoning/flavoring”

You could flavor your mashed potatoes a million ways. Here are just a few common go-to choices.

  • Simply season with salt and pepper.
  • Paprika always looks lovely sprinkled on mashed potatoes.
  • Rosemary provides wonderful flavor.
  • Garlic – well of course! (I love garlic.) Add minced garlic, roasted garlic, or you could actually cook garlic cloves with the potatoes. You also could add minced garlic – and/or other aromatics such as shallots and onions to your heated oil or margarine before pouring into the potatoes while mashing.  If you’re feeling lazy, you could just sprinkle on some garlic powder and/or granulated onion (though it won’t be quite as flavorful as using fresh).

Serve & Enjoy.